 |
RAV4-EViewby Cathy Saxton This page will document my progress creating a small device to monitor the ECUs (electronic control units) in a RAV4-EV via the OBD-II (on-board diagnostics) port. Why?The car's ECUs have a lot of information that is not reflected in the analog gauges, and those gauges aren't even especially accurate. We'd like to be able to do things like track our energy usage to make sure we're driving efficiently, get an accurate indication of the battery charge, and get diagnostics such as individual battery pack voltages and internal resistances (especially key for us since we don't have a local certified RAV4-EV service location). The RAV4info Palm app shows a lot of this information. It's great and provides a lot of interesting data, but not everything that I'd like. Also, Palm devices aren't as small as I'd like, and pose a mounting challenge. As a robotics hobbyist, I thought this looked like an interesting project, and it provided me an opportunity to be able to customize the display with the features I found interesting. Current StatusJuly 6, 2010Once again, sorry for the long delay in providing updates. I've been making good progress, including solving a very annoying and perplexing issue, but have been too busy (and obsessed with programming) to make regular updates here. Here's a summary of the notable feature additions in the past several months. In addition to showing pertinent data when driving, there are several other views that are interesting:

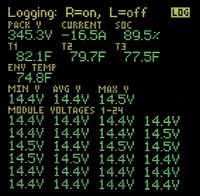
The first two were already largely complete from the proof-of-concept software, but have been improved in subtle behind-the-scenes ways. The highlights view -- shown on the right -- is new, and both it and the module view now provide logging to a MultiMediaCard (MMC). Values are written when logging starts; when values change, the new value and a time indicator are written to the log file. That data can be graphed, e.g. in Excel, to show things like charge performance. Some other recent feature additions:
A partial list of what I'll be working on next...
For the techies reading this, here's a little bit of detail on some of the internals and challenges. All values received from the car are now cached, so they are available immediately when changing views (no need to wait for the next query of that item). The other big 'internal' accomplishment was tracking down an elusive problem. Some background: there are two ECUs that I can communicate with via the OBD-II port -- Battery and EV. The basic procedure is to send a special connection command to an ECU, then send queries for the desired data. The tester only connects to and queries one ECU at a time. I determined when I started this project that I could establish a connection to both of them and then query each of them as necessary to get the data of interest (e.g. vehicle speed from EV; SOC from Battery). The annoying problem mentioned above was that I was having an issue with the Battery ECU sometimes going off into a state where it kept spewing messages. This problem happened during times when I was talking to both ECUs, but sometimes the communications worked fine, and other times the Battery ECU got unhappy. After much testing, observation, and analysis, I determined that the problem happened in the case where I connected to the Battery ECU first, then connected to the EV ECU, and then queried the Battery ECU. If I connected in the other order, both ECUs were happy. That scenario proved to be very reliable, always performing the same way based on connection order. Yay! Part one of solving the problem was done (it's hard to solve a problem if you don't know what's causing it). So, my short-term fix was to force connecting in the right order for views that used both ECUs (e.g. the 'drive' view). But, manually switching views could still produce this problem, although you had to work pretty fast, doing two view switches in just a few seconds, and basically be trying to cause this problem. At any rate, I wanted a solution that always prevented this problem and came up with an algorithm that I hoped would work. I recently had a chance to test it and it worked beautifully! Nice and simple, too: if I connect to the EV ECU while the Battery ECU is connected, I just set my internal status for the Battery ECU to disconnected; that forces a connect to it before I try to query it again. February 7, 2010 (evening)This afternoon I went to Metrix Create:Space and had solder stencils lasercut. These stencils provide a convenient way to apply solder paste to the pads for surface mount components on the circuit boards. Photos and more explanation tomorrow after I get some sleep! The details on the stencil are documented on their own page. (The boards shown on that page are the top and bottom boards for RAV4-EView.) February 7, 2010 (morning)On Thursday I spent several hours with a friend using his milling machine to make the cut-outs in the box for RAV4-EView. (Thanks Jim!) It turned out great! Eventually, my plan is to have Polycase mill the boxes, but I wanted to make a prototype box to test the layout (and make sure my dimensions were correct). 

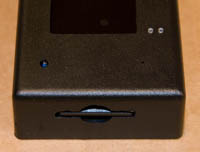
The picture above shows the box with a MultiMediaCard next to it, near its slot. The picture on the right shows the side of the box, with the MMC fully inserted. (It's a push-to-release socket.) The rectangle is for the OLED screen. The one in the picture still has its protective plastic coating, which is why there are a few air bubbles visible. The dark blue plastic dome in the upper left is a light sensor; I hope to be able to use that to offer an auto-dim feature for night driving. There are 3 locations for indicator light LEDs -- 2 that have clear plastic 'light pipes,' and another location that just has a tiny hole at the moment (it's directly below the light sensor, near the bottom of the box). I want to experiment with various options; the light pipes should help bring the light from the board to the outside of the box. I may try recessing them into the box a bit more. Yesterday, I was able to borrow a tester again (thanks Dan and Marc!) and snooped the communication for turning on (and off) the fans to force cooling of the batteries. I spent a little time looking at the logs and think it will be straightforward to add that functionality to RAV4-EView. February 1, 2010I got version 1.1 boards today! Components are on order, hopefully they'll be here mid-week and I can get them soldered on by the weekend. I've been working on calculating positions of cutouts for the box that will hold the boards. A friend has generously offered to let me use his milling machine to make a prototype box, and I'm hoping to get that done very soon. (The box is a Polycase model, with holes cut in appropriate locations for things like the OLED, navigation buttons, MultiMediaCard socket, and connection to the car.) January 2, 2010All sorts of fun progress! Bootloader -- This is special code that will enable firmware updates. This means that I'll be able to ship RAV4-EView with a reasonable number of features, but can keep working and add more stuff later. So, I don't have to wait to have all the bells and whistles done before everyone can start playing! When there's a new version, RAV4-EView will be able to update itself by reading a file from the MultiMedia Card. I've got the bootloader code working, and have code that can locate and read files from the MultiMedia Card, just need to combine them. Temperature sensor -- This was easy but fun. I have a small circuit board that can monitor temperature. There's a convenient place to hook this up under the hood. Wireless communications -- This was the most satisfying accomplishment: I have two devices communicating wirelessly!
As you might expect, this means that I can have the temperature board relay information to RAV4-EView. One other note on this... I will no longer be referring to this as 'ZigBee' since I won't actually be using that specific protocol. This is yet another case of horrendous licensing fees ($3,500 to join, plus $500-$1,000 to certify each product). So, I'll be using the public-domain 802.15.4 protocol in the 2.4 GHz range, but will use my own design for the data packets. Fortunately, none of that matters to people who use RAV4-EView and its wireless accessories. They'll all work together just fine! Up next... I've completed just about all of the testing I needed to do in order to ensure that I've got the circuit boards designed correctly. I did of course have to make some tweaks. So, I'll be ordering the next set of prototype boards. I've still got plenty of work to do on code, so I'll stay busy while I'm waiting for the boards. September 27, 2009Well, I've been pretty delinquent in getting status updates here... Sorry! The good news is that I've actually made progress that I didn't document here. The bad news is that it's not as much progress as I'd like. I had a period of a month or so where other activities distracted me from this. OK, enough apologizing... on to the current status!
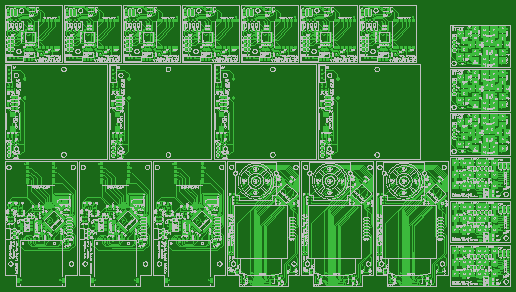
The boards are all soldered up (got that done in June, shortly after the boards arrived). The pictures on the right show the top and bottom boards. They will be stacked, connected using the 14-pin header seen in the bottom center of each board. The main features of the top board are a microcontroller, the OLED, 5 navigation buttons, a light sensor, 2 bi-color LEDs, and one 'standby' LED. The main features of the bottom board are another microcontroller, an MultiMedia Card reader, a wireless communication module, and the components necessary for talking to the RAV4-EV. Existing code is ported to the new system, so the display works, and I can monitor buttons and control LEDs. More recently, I've been working on new code: communication between the two microcontrollers (via I2C/TWI), and talking to an MMC card. The latter is something I hadn't done before, and I had a lot of fun working on that. I'm currently able to read from the card and interpret its file system so that I can see what's on the card and read contents of files. Next up is actually writing files. The next major project is wireless communications. June 5, 2009I've selected parts, designed boards, and ordered a few prototype boards. I've also designed a couple of boards for LED lighting that can be automatically shut off by a microcontroller after being on for "too long." Name! We've chosen a name for the device: RAV4-EView Mounting update: RAV4-EView will be in a box that is approximately 4" x 2 1/4" x 1" 2 1/4" x 1 1/8" x 7/8". Mounting under the radio as I had originally intended would cause too much obstruction of the charging panel. So, our current thought is to mount under the charge panel, leaving just a bit of space for pen and paper in the cubby where the ashtray was (we removed the ashtray insert and use that area for storage). We're still working on exactly how to mount the box, and of course it could be mounted anywhere you want. Features: Based on feedback, I added wireless communication. RAV4-EView will support 802.15.4 (2.4 GHz), and I've also created a couple of boards to use in other locations (see details below). Here's a picture showing the image of the PCB (printed circuit board) panel I ordered.
There are a few each of six different boards. March 30, 2009Proof-of-concept on the hardware, software, and communications is done. I still need to design and test a mounting solution and want to consider adding additional features. I have successfully deciphered the communication protocols and can query the car for the data that the tester shows. I am using the display that I intend to use for the final project, but it's on a more general-purpose board, so is not the desired size or shape. I also want to add various hardware features, for example an MMC card reader for logging data. Next, I'll be creating a prototype board with the correct shape and hardware features. My plan is to mount it beneath the radio. After verifying (and possibly updating) the prototype, I can do more of a production run if there's interest from others in getting a device. I expect that I would sell these for around $200 $150. That assumes a minimum of 10 boards; substantially more would lower the price, but I figure that's unlikely, so I want to set expectations at a reasonable level. I welcome feedback if anyone has suggestions for features they'd like to see. The photograph below shows the summary data screen and my general-purpose board. The graphics are generated by the board, but I simulated values so that I could have a nice example display. The bar at the top shows energy usage of a little over 90A. The actual board will have the screen rotated so that the connector is to the side (instead of below the screen), and the board will be only a bit taller than the screen.

The photograph to the right shows the 'tester mode' screen. The UP and DOWN pushbuttons scroll through the data. FeaturesSoftwareThe first version will include the following features:
The following may also be included, or might be done as firmware upgrades:
HardwareThis section has been updated based on the prototype boards that I ordered; it may change again based on experiments!
Techie DetailsFor those interested in the technical details for the hardware, protocols, etc, I'll be posting some information here as I have time. For now, though, I'll just start with my list of thank-yous:
Page Revisions
|
| ©2000-2026 Idle Loop Software Design, LLC. You may not copy or reproduce any content from this site without our consent. |


 Battery pack
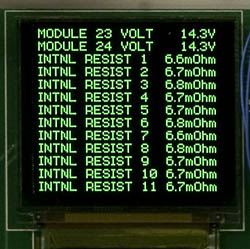
screen: shows voltages and internal resistances for the 24 battery packs. The photo on the right shows
a sample screen. The red values are voltages that are problematic (too far from average or too low).
(Note: I simulated the values that are showing up in red; our batteries are healthy!)