|
|
3kg Sumoby Tom Saxton I've started working on a 3kg sumo robot to compete in this year's Robothon. For 2007, the Robothon 3kg Sumo is allowing radio control, so I'm planning a sumo robot that can run autonomously, manually by R/C control, or a hybrid autonomous with guidance from an R/C driver. The first prototype was built on a simple base made of basswood. 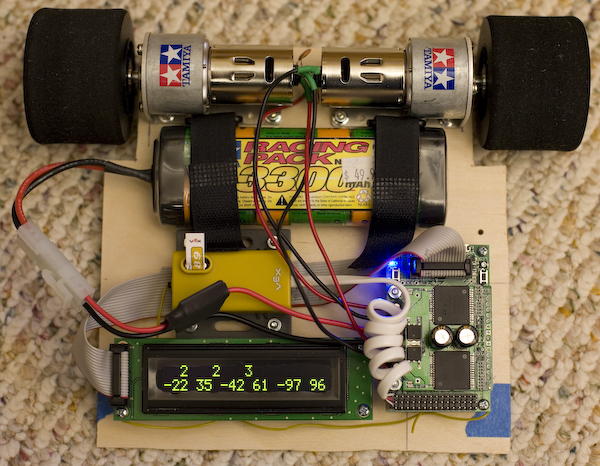
Once I had a pretty firm idea of the hardware I wanted to use, I created a CAD model of the chassis I wanted to build. It took me most of five days to create this simple chassis in AutoDesk Inventor. It took so long because I'm a novice Inventor user, because I had to create 3D models of all the parts, not just the chassis, and because even such a simple chassis turns out to be pretty complex. 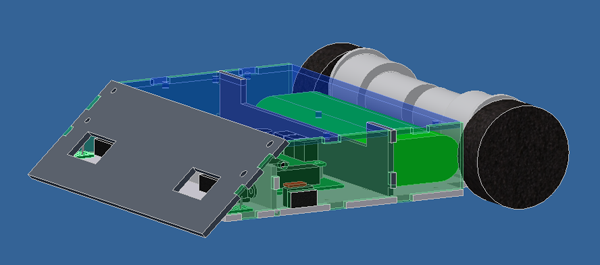
The next step was to turn the CAD model into parts. Pololu has a custom laser cutting service with good prices and generally quick turn around. I chose black ABS for the base and scoop, and translucent blue acrylic for the rest of the parts. (Thanks to Cathy for the idea of using translucent instead of clear.) Here's the chassis as it was shown at the SRS meeting on June 16, 2007. 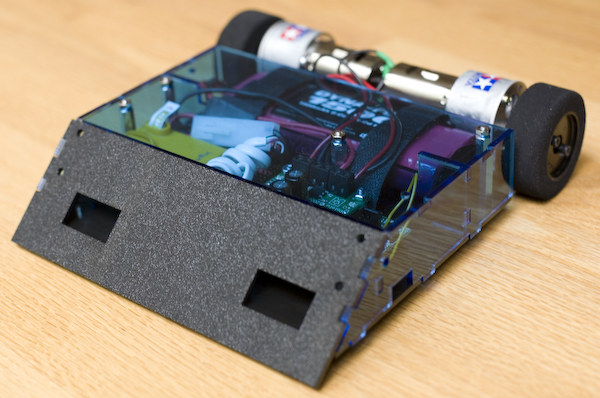
Cutting the parts found the problems in the CAD model: two missing holes in the base for tabs on the side pieces and one tab on the vertical plate between the battery and the electronics was too tall. Also, the distance sensors were intended to be symmetric, but they aren't. Next step: Wire up and test the sensors, figure out where to place the power and mode buttons, fix the errors in the CAD model, then decide on materials for the final chassis. Right now, the robot only weighs 2.5 pounds, less than half of the 6.6 pound limit. I'm thinking that I will have the base and scoop pieces cut from stainless steel, leaving the other pieces clear acrylic. That should get the weight up, give more than enough strength, and still leave the cool translucent blue look. Here's the hardware list:
Being a programmer by trade, I consider the controller to be the base of the robot. I chose the Orangutan X2 for what it packs into a small, convenient package. It starts with the powerful Atmel ATmega644, which is way more processor than you need for a sumo, then adds pretty much everything else you need. The board is set up with a voltage regulator, a socket for an LCD character display, three buttons and five user-controllable LEDs. All of the A-port and D-port pins are brought out on headers, with ground and power (battery, servo, or regulated 5V). Most of the B- and C-port pins are used for the LCD, buttons and LEDs. That's already a pretty nice board, but there's also an ATmega168 on board that connects to the 644 via SPI and to a USB-to-serial bridge chip. They've implemented an AVRISP2 programmer on the 168, so you can program the 644 straight from your computer with just a mini-USB cable; no programmer required! The 168 does a bunch of other stuff, too. It can run Pololu's Dual High-Current Motor Controller Board, which is plenty tough enough to run the Tamiya motors I picked (the motors stall around 10A, the VNH2SP30 driver board can handle 15A for 150 seconds before shutting down). The motor controller board stacks on top of the Orangutan controller, which gives the whole setup a nice small footprint. The 644 talks to the 168 over ISP, so it only takes four pins (MOSI, MISO, SCK and SS) to run two independent motor contollers (including dual current sensors on the high-end model) setting PWM, direction and braking, plus it also gives the 644 access to a tone buzzer, the serial-to-USB bridge, and the EEPROM on the 168. I've just scratched the surface using the firmware on the 168, but it provides sophisticated control and monitoring of the motor controllers and the other peripherals while still leaving lots of pins available on the 644. Using the current sensors on the motor controllers, you can set a current limit through the firmware on the 168, or you can get the current sensor reading and manage the current yourself from the 644. So far, I've mostly been working on the software. At first I thought I'd use a standard R/C receiver and decode two of the PWM outputs, interpreting them as forward-reverse and left-right, computing left and right motor PWMs, and sending them to the motor contollers. The 644 has a great feature that lets you use any input pin as a digital interrupt, so you can decode as many PWMs as you have available pins. I got that code all working, then I came across a sale on Vex radios. Their radio receiver doesn't decode the separate PWM signals, it just spews the combined signal (PPM) to the Vex controller. As I contemplated the cheap radio, I realized that having all six PWMs on one line is a good thing. Now I just have an interrupt running on one pin and can decode all six channels. This lets me do things I probably wouldn't otherwise do, like use two more PWM channels (corresponding to the buttons on the back of the Vex radio) to run the menu on the LCD. It's pretty handy to select the driving mode and calibrate the joysticks without having to push little buttons on the robot. Here's a simplified version of my PPM decoding code. It's written in C++ for an Atmel ATmega processor, but the idea should translate to other processors that support interrupts. You'll have to supply a timer with sufficient resolution to measure the pulse widths. The tires that came with the motors, and are shown in the photo, are too wide for a 3kg sumo. Even with the motors packed right next to each other, the total width of the setup is about 25 cm with the foam tires, but the sumo contest limits the size to 20 cm. Cathy found the replacement tires (and hubs) that are listed above. It's still going to require mounting the motors as close to each other as possible, but it looks like it will work out. Next up is designing the chassis... Full Disclosure Our friends Jan and Candice at Pololu gave me a pre-release version of the Orangutan X2 for testing and feedback on the firmware. I'll gladly pay for the next one! Our friend Jim Kindsvater at Maximum Robotics let me check out the motors live and in person, and sells them at a good price. |
| ©2000-2026 Idle Loop Software Design, LLC. You may not copy or reproduce any content from this site without our consent. |